In today’s digital age, whether you’re a professional photographer or an ordinary individual, you may come across situations where you need to remove unwanted objects or elements from an image, such as text, people, watermarks, colors, lines, backgrounds, and more. In this article, we will guide you on how to quickly erase unwanted objects or elements from an image using Photoshop.
- Step 1: Choose the Right Tool
- Step 2: Duplicate the Original Image (Layer)
- Step 3: Use the Spot Healing Brush
- Step 4: Use the Clone Stamp Tool
- Step 5: Use Content-Aware Fill
- Step 6: Refining and Polishing
- Step 7: Save and Export
Step 1: Choose the Right Tool
Photoshop offers various tools for removing unwanted objects from an image, including the Spot Healing Brush, Clone Stamp Tool, and Content-Aware Fill. Each of these tools has its unique purpose, as well as its strengths and limitations. Depending on your specific needs, you can choose to use one of these tools.

Step 2: Duplicate the Original Image (Layer)
Before you start removing objects from the image, it’s essential to create a duplicate of the original image (layer) to prevent irreversible edits. To duplicate the background image (layer), right-click on it in the Layers panel and choose “Duplicate Layer.”
Step 3: Use the Spot Healing Brush
The Spot Healing Brush is a great tool for quickly removing small blemishes, spots, or unwanted elements from an image. Simply select the Spot Healing Brush tool from the toolbar, adjust the brush size to match the object you want to remove, then click or brush over that area. Photoshop will intelligently analyze the surrounding pixels and seamlessly blend them to fill in the gap.

Pros:
- Quick and Easy: The Spot Healing Brush tool is simple and fast to use, allowing you to remove small blemishes, spots, or distracting elements from an image with just a few clicks.
- Automatic Blending: The Spot Healing Brush tool automatically samples nearby pixels and seamlessly blends them while preserving the texture and details of the image.
- Real-time Preview: As you brush away unwanted elements using the Spot Healing Brush tool, you can see the results in real-time. This allows you to make adjustments as needed, ensuring accurate and fine-tuned results.
Cons:
- Limited Scope: The Spot Healing Brush tool is primarily designed for small-scale removal of objects in an image. When used for larger or more complex areas, it may result in unintended smudging, artifacts, or distortions, requiring additional manual adjustments.
- Lack of Flexibility in Editing: The Spot Healing Brush tool directly affects the original image rather than creating a new layer. Once the Spot Healing Brush is applied, it becomes a permanent part of the image, unless you use the History panel or revert to a previous version of the image.
Step 4: Use the Clone Stamp Tool
When dealing with larger or more complex objects, the Clone Stamp Tool is your go-to option. This tool allows you to sample pixels from one area of an image and clone them onto another area. In Photoshop, select the Clone Stamp Tool, then hold down the Alt key and click on an area that is similar to the area you want to remove. Release the Alt key and start brushing over the object to copy the sampled pixels onto it.

Pros:
- Custom Sampling: The Clone Stamp Tool allows you to select a source sample area and precisely replicate it to other locations. This enables you to copy textures, details, and colors within an image, resulting in more accurate repairs or editing effects.
- Effective for Restoration: The Clone Stamp Tool is highly useful for repairing larger or complex objects. It can replicate the details and features from one area onto the area that needs restoration, seamlessly blending the repaired portion with the surrounding environment.
- High Flexibility: The Clone Stamp Tool can operate across different layers and allows adjustments to opacity and blending modes. This provides a high level of flexibility and control when performing intricate edits and repairs.
Cons:
- Requires Time and Patience: As the Clone Stamp Tool involves manual copying and adjustment, dealing with larger areas or complex textures may require more time and patience. Complex editing tasks may involve multiple sampling and adjustments to achieve the desired final outcome.
- Potential for Repetition: In some cases, using the Clone Stamp Tool can result in noticeable repetition. Especially when dealing with extensive textures, if the same sampling point is inadvertently used, visible duplication marks may appear.
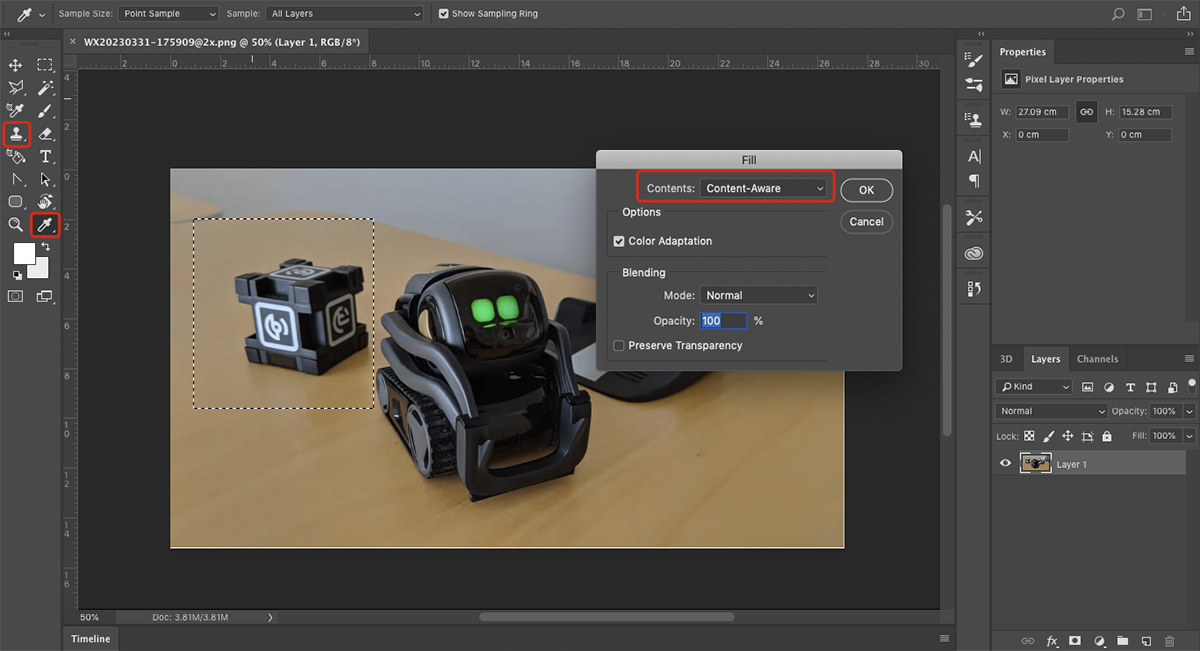
Step 5: Use Content-Aware Fill
Content-Aware Fill is a feature introduced in later versions of Photoshop that automates object removal. It intelligently analyzes the image and fills the selected area with content that matches the surrounding pixels. To use Content-Aware Fill, you need to create a selection around the object you want to remove, then go to “Edit” > “Content-Aware Fill” and let Photoshop work its magic. You can refine the results using the provided options and then click “OK.”

Pros:
- Quick and Easy: With Content-Aware Fill, you simply select the area you want to repair or remove and click the corresponding command to automatically fill the selected area. This process is straightforward and fast, saving you a lot of time and effort compared to manual repairs.
- Preserves Details and Textures: Content-Aware Fill intelligently preserves the details and textures of the image. It analyzes the surrounding content and tries to maintain the original characteristics of the image as much as possible, resulting in natural and seamless repairs.
- Adjustable and Previewable: Content-Aware Fill provides adjustment options that allow users to fine-tune the filling results. You can adjust the filled area, the number and location of the sampling sources, and other parameters to achieve the best repair effect. Additionally, you can preview the filling results in real-time and make adjustments as needed to ensure satisfactory repairs.
Cons:
- Manual Adjustments for Complex Areas: When dealing with complex areas where the surrounding content may not provide suitable references or the area contains intricate textures and patterns, the filling results may appear unnatural or have noticeable flaws. In such cases, further manual adjustments and refinements are required.
Step 6: Refining and Polishing
After removing the objects, it’s important to refine and polish the image based on the overall effect. This involves blending noticeable seams, adjusting brightness and colors to ensure that the edited area seamlessly blends with the rest of the photograph.

Step 7: Save and Export
After completing the object removal, choose the appropriate file format and compression settings based on the purpose of the image. If you want to preserve layers and editability, save the file in Photoshop’s native .PSD format. Otherwise, consider saving it as a high-quality JPEG or any other suitable format.
Conclusion:
By following the steps and recommended tools outlined in this article, you can start experimenting with removing objects or elements from your images. It may not be smooth sailing at first, but as you explore and practice, you will unlock the powerful potential of Photoshop.